Multitool.org Forum
+-

Hello Lurker! Remove this ad and much more by logging in.


Tofty's Custom Brass Torches

Tofty · 104 · 16160

gb Offline Tofty

  • *
  • Hero Member
  • *****
    • Posts: 537
Tofty's Custom Brass Torches
on: December 07, 2011, 10:06:49 PM
Some of you may have caught some of this plan on another thread:
http://forum.multitool.org/index.php/topic,31876.30.html
but since finishing this project is going to take a while i felt it could do with its own page.

This is a shell mod for a cheap Chinese AAA LED torch, with a few added features like a lanyard point and improved water resistance.

This is the first of three sections completed:


Do stay tuned..... 
« Last Edit: March 05, 2012, 01:50:04 AM by Gareth »
Pictures of most of my work can be found on my Facebook Page.
Also have a look at my Shapeways Shop and SW Torch Shop for 3D printed items.


gb Offline 5hif7y

  • Hero Member
  • *****
    • Posts: 759
  • tooled up
Re: Brass AAA Custom Shell (WIP)
Reply #1 on: December 07, 2011, 11:06:05 PM
that looks great mate. i fink it looks nice in half black half brass.  :drool:
-----5hif7y-----


scotland Offline Gareth

  • Admin Team
  • Point Of No Return
  • *
    • Posts: 36,703
Re: Brass AAA Custom Shell (WIP)
Reply #2 on: December 08, 2011, 12:06:57 AM
Oh, I'm tuning into this thread for sure.  Looks lovely mate. :cheers:
Be excellent to each other and always know where your towel is.


gb Offline badwolf

  • No Life Club
  • ******
    • Posts: 1,780
  • my best friends a dog
Re: Brass AAA Custom Shell (WIP)
Reply #3 on: December 08, 2011, 12:20:19 AM
Splendid job, look forward to seeing it finished :tu:
"I like me, my wife likes me"

JC PT&A


hr Offline enki_ck

  • Global Moderator
  • *
  • Absolute Zombie Club
  • *
    • Posts: 20,904
  • I may get older but I refuse to grow up.
Re: Brass AAA Custom Shell (WIP)
Reply #4 on: December 08, 2011, 12:21:03 AM
Looks like it will be an interesting project. :tu: And pics are always welcome here, and lots of them. I for one would like to see the process of making one too.  :pok:


cs Offline edcgear

  • No Life Club
  • ******
    • Posts: 3,570
Re: Brass AAA Custom Shell (WIP)
Reply #5 on: December 08, 2011, 07:07:02 AM
 :drool: :drool: :drool: :drool:

Looking great!!

 :gimme: :gimme:
ΜΟΛΩΝ ΛΑΒΕ
There is method to my madness....
http://svakodnevnesitnice.blogspot.com/


ph Offline edap617

  • No Life Club
  • ******
    • Posts: 3,958
Re: Brass AAA Custom Shell (WIP)
Reply #6 on: December 08, 2011, 07:41:54 AM
That's a nice one.  :drool:


gb Offline Sparky415

  • Zombie Apprentice
  • ********
    • Posts: 12,996
Re: Brass AAA Custom Shell (WIP)
Reply #7 on: December 09, 2011, 01:07:16 AM
Splendid job, look forward to seeing it finished :tu:

+1

Dear Santa,
I really need a lathe  :D
Everything’s adjustable


ca Offline Metropolicity

  • *
  • No Life Club
  • ******
    • Posts: 3,797
  • Hack Virtuoso
Brass AAA Custom Shell (WIP)
Reply #8 on: December 09, 2011, 08:44:53 AM
I really need to figure out how to use my knurling tool properly. Any tips Toft?.
Why stop now?

Visit the whole Skinth family here: http://www.skinthsolutions.com

Keep up with The Skinths on Facebook: http://www.facebook.com/SkinthSolutions

Shapeways - Metro's Q-branch:
http://www.shapeways.com/shops/metro-qbranch

PayPal: metrogradegoods [at} gmail. com


gb Offline Tofty

  • *
  • Hero Member
  • *****
    • Posts: 537
Re: Brass AAA Custom Shell (WIP)
Reply #9 on: December 09, 2011, 06:37:14 PM
Thanks everyone,

Funny you should ask Eric, for some reason my knurler has just stopped working for me, don't know why.
Normally it works first time but i had to turn this torch part down to about 15.7mm diameter (from 16mm) before the knurling aligned properly and since then i cant get it to work at all. I'm going to go back to some theory study and then experiment over this weekend. As requested the making of the next section will be accompanied by a 'process of making' photo guide so i'll make a point of showing the knurling setup and any conclusions i come to on the matter........One thought i have had but not tested is that the surface has to be very smooth or the wheels tend to wander between cutting lines causing the knurling to skip, the parts that have failed haven't had a smooth surface as i meant to sand them down after knurling.
Pictures of most of my work can be found on my Facebook Page.
Also have a look at my Shapeways Shop and SW Torch Shop for 3D printed items.


gb Offline Tofty

  • *
  • Hero Member
  • *****
    • Posts: 537
Re: Brass AAA Custom Shell (WIP)
Reply #10 on: December 10, 2011, 01:14:00 PM
Some slightly better shots of the first piece:


I'm starting the think that i may not knurl the middle and back parts anymore, we shall see......
Pictures of most of my work can be found on my Facebook Page.
Also have a look at my Shapeways Shop and SW Torch Shop for 3D printed items.


cs Offline edcgear

  • No Life Club
  • ******
    • Posts: 3,570
Re: Brass AAA Custom Shell (WIP)
Reply #11 on: December 10, 2011, 02:34:44 PM
Polished brass looks great too!!  :D
ΜΟΛΩΝ ΛΑΒΕ
There is method to my madness....
http://svakodnevnesitnice.blogspot.com/


gb Offline Tofty

  • *
  • Hero Member
  • *****
    • Posts: 537
Re: Brass AAA Custom Shell (WIP)
Reply #12 on: December 20, 2011, 07:11:28 PM
Tease.....


Still a fair amount to be done but it's nice to know the internal dimensions are right and good contact is being made on the light engine board, a quarter turn of the head turns it off and with an extra o-ring the action is a little firmer than the original.

As you can see i've knurled the full length, i'll go into detail with some pictures when everythings finished, the main thing still to do is cut some flats into the main body for the pocket clip to rest on and de-burr the end cap after having milled it's lanyard hole.
Pictures of most of my work can be found on my Facebook Page.
Also have a look at my Shapeways Shop and SW Torch Shop for 3D printed items.


gb Offline Sparky415

  • Zombie Apprentice
  • ********
    • Posts: 12,996
Re: Brass AAA Custom Shell (WIP)
Reply #13 on: December 20, 2011, 07:33:58 PM
Its Alive!!!  :ahhh


Very nice  :tu:
Everything’s adjustable


cs Offline edcgear

  • No Life Club
  • ******
    • Posts: 3,570
Re: Brass AAA Custom Shell (WIP)
Reply #14 on: December 20, 2011, 08:08:09 PM
 :drool: :drool: :drool: :drool: :drool: :drool: :gimme: :gimme: :gimme: :gimme:
ΜΟΛΩΝ ΛΑΒΕ
There is method to my madness....
http://svakodnevnesitnice.blogspot.com/


scotland Offline Gareth

  • Admin Team
  • Point Of No Return
  • *
    • Posts: 36,703
Re: Brass AAA Custom Shell (WIP)
Reply #15 on: December 21, 2011, 07:47:37 PM
 :tu:
Be excellent to each other and always know where your towel is.


gb Offline Essexman

  • No Life Club
  • ******
    • Posts: 1,222
Re: Brass AAA Custom Shell (WIP)
Reply #16 on: December 21, 2011, 09:35:27 PM
Very nice work. I did warn you about modding torches, there's no turning back now   :ahhh


us Offline tattoosteve99

  • *
  • Absolutely No Life Club
  • *******
    • Posts: 6,316
Brass AAA Custom Shell (WIP)
Reply #17 on: December 25, 2011, 07:17:59 PM
Ok when will you be selling these??????
If I remember correctly, wait, what was I saying?


gb Offline Tofty

  • *
  • Hero Member
  • *****
    • Posts: 537
Re: Brass AAA Custom Shell (WIP)
Reply #18 on: December 27, 2011, 02:57:44 AM
There's no gain in trying to sell torches like this one as the internals are still those of a £2.50 torch and it just doesn't justify itself, i made this as an experiment into various techniques and quickly realised the man-hours involved are too great, i mean i still haven't actually finished it yet (awaiting a special milling bit).

I suspect the only chance of there being a small brass torch for the people is to petition maratac into making them. I'm not sure if the copper torches were considered a success or not by them so they may think it's a terrble idea to make another speSmurfpillst item anway.
« Last Edit: December 27, 2011, 03:05:23 AM by Tofty »
Pictures of most of my work can be found on my Facebook Page.
Also have a look at my Shapeways Shop and SW Torch Shop for 3D printed items.


gb Offline Tofty

  • *
  • Hero Member
  • *****
    • Posts: 537
Re: Brass AAA Custom Shell (WIP)
Reply #19 on: January 02, 2012, 09:37:21 PM
Finally finished:


I'll put up pictures showing some of the biuld process tomorrow.
Pictures of most of my work can be found on my Facebook Page.
Also have a look at my Shapeways Shop and SW Torch Shop for 3D printed items.


gb Offline 5hif7y

  • Hero Member
  • *****
    • Posts: 759
  • tooled up
Re: Brass AAA Custom Shell (WIP)
Reply #20 on: January 02, 2012, 09:41:42 PM
looks brilliant mate.  :drool:
-----5hif7y-----


gb Offline Mike, Lord of the Spammers!

  • Chief of the Absolutely No Life Club!
  • *
  • Abandon All Hope Ye Who Enter Here...
  • ***********
    • Posts: 42,975
  • Why haven't you got a Farmer yet!
Re: Brass AAA Custom Shell (WIP)
Reply #21 on: January 02, 2012, 10:07:28 PM
Stunning work mate :tu:
Give in, buy several Farmer's!!!!!!


gb Offline Sparky415

  • Zombie Apprentice
  • ********
    • Posts: 12,996
Re: Brass AAA Custom Shell (WIP)
Reply #22 on: January 02, 2012, 10:31:22 PM
Congratulations  :tu: that has turned out looking Great!  :drool:
Everything’s adjustable


cs Offline edcgear

  • No Life Club
  • ******
    • Posts: 3,570
Re: Brass AAA Custom Shell (WIP)
Reply #23 on: January 02, 2012, 10:42:38 PM
Wooow.... That looks way too cool!!  :drool: :drool: :drool: :drool: :drool: :drool:
ΜΟΛΩΝ ΛΑΒΕ
There is method to my madness....
http://svakodnevnesitnice.blogspot.com/


scotland Offline Gareth

  • Admin Team
  • Point Of No Return
  • *
    • Posts: 36,703
Re: Brass AAA Custom Shell (WIP)
Reply #24 on: January 03, 2012, 01:47:06 AM
I love it, very 'Steampunk'. 8)
Be excellent to each other and always know where your towel is.


gb Offline Tofty

  • *
  • Hero Member
  • *****
    • Posts: 537
Re: Brass AAA Custom Shell (WIP)
Reply #25 on: January 03, 2012, 08:57:07 PM
Right then, this is the 'process of making' section for the central section of the torch. There arn't too many pictures as i kept forgetting to take any at important points so if it all gets too unclear ask and i'll take some more photos of anything specific.
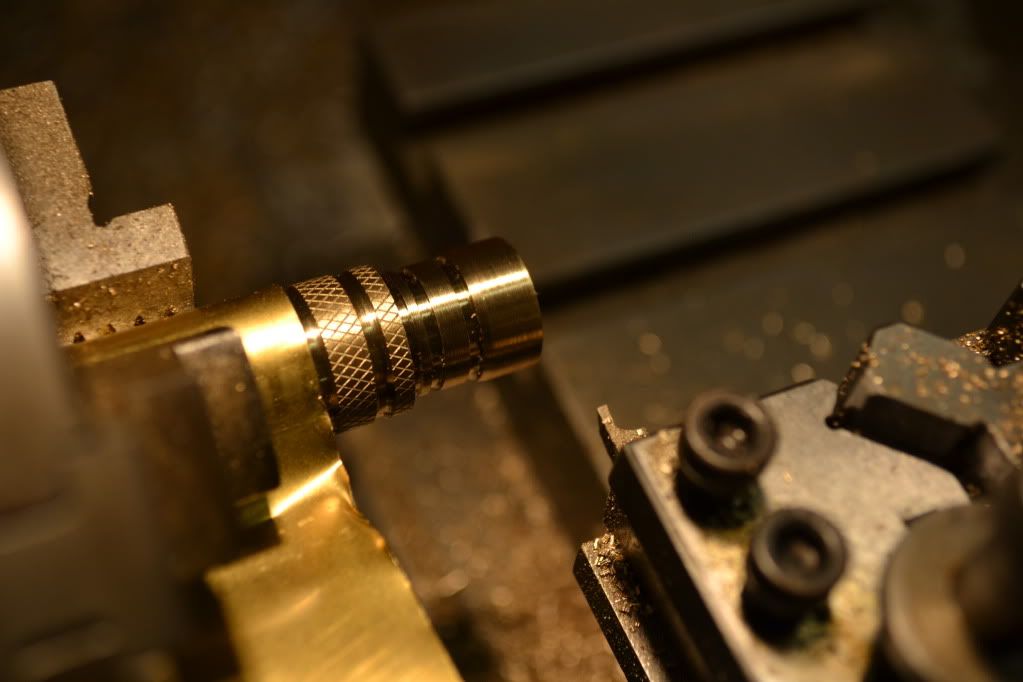
Knurling.
This is the very first process undertaken as it is the most likely to fail.


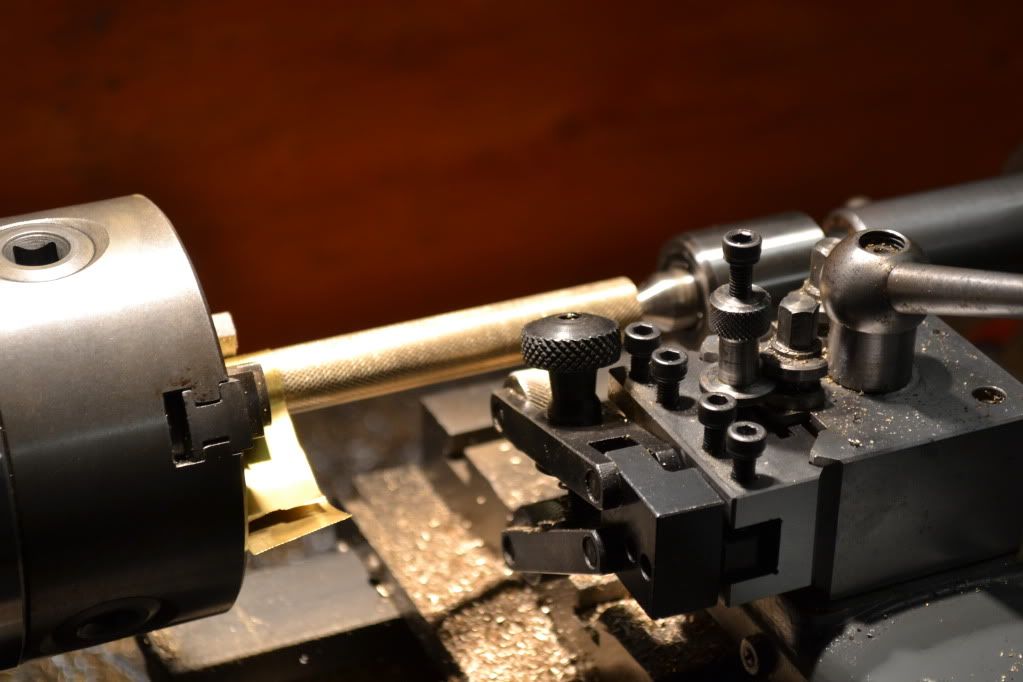
A knurling tool like the one in the picture is essential as it reduces lateral forces applied to the lathe spinal while forming. Getting the knurling to line up on the work piece can be very time consuming;
The cutting wheels each have one half of the knurl pattern, and the wheels have a fixed diameter so the work piece has to be of a coresponding diameter that allows the pattern on the wheels to drop into the already cut paths on the work is it rotates.
There are calculations to work out what the work diameter could be if you know the cutting wheel diameter and pattern distance, however it's usualy easier just to make a light cutting pass along the work, check alignment and then take off a light skim from the surface leaving a smooth surface and trying again.
I started with 16mm diameter brass rod and had to turn it down to 15.8mm before the knurling cut well.
Sometimes it works first time, it all depends on the diameter and how lucky you are.

Cutting the rings.
This is one of the easiest processes and i just did it by eye.


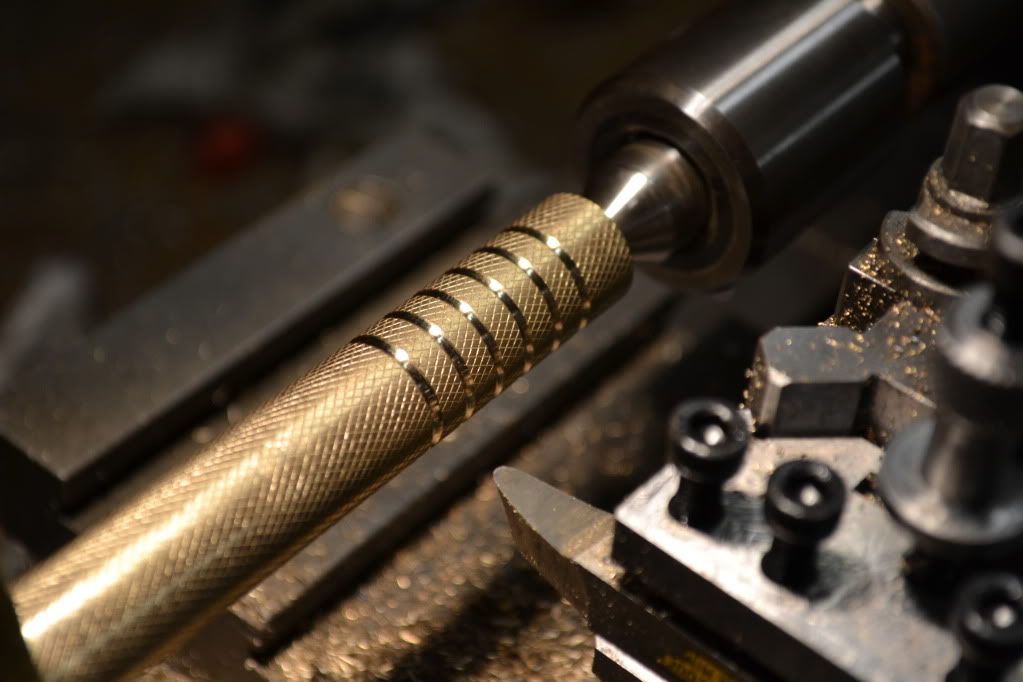
I start by setting the distance i want the rings from one end on my calipers then use them to scratch a ring on the work while it's spinning.
Then i use the radiusing tool and bring it into the work until i'm satisfied with the result, i make a note of the depth of cut on the cross slide then repeat the process.
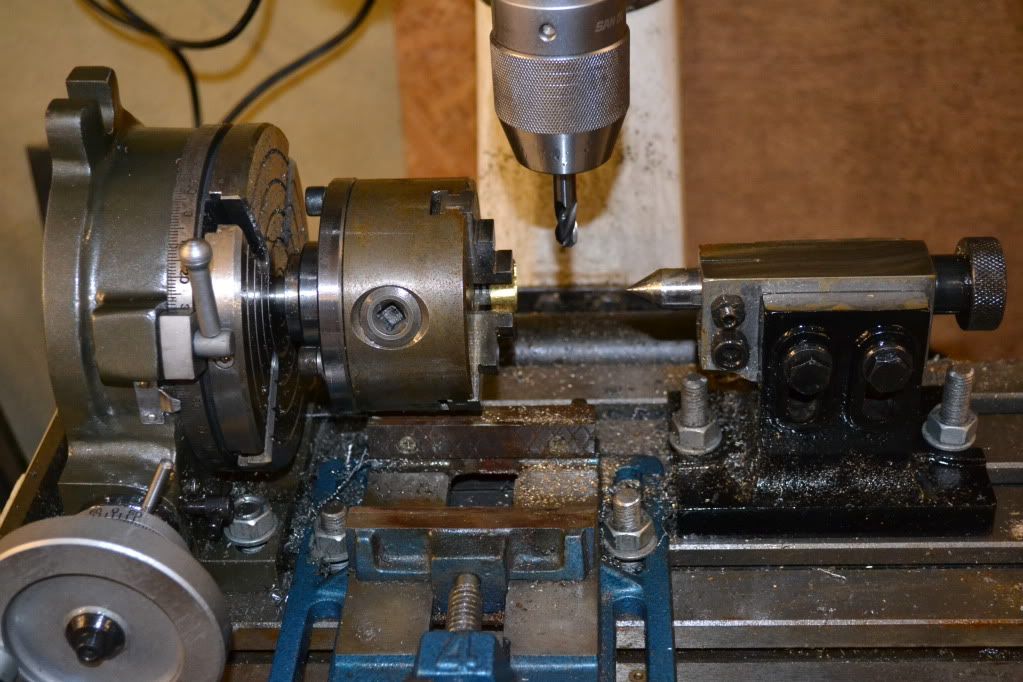
Boring.
This should be done after knurling and other cutting process if possible due to the fact that the bored out tube of metal will flex more if pushed laterally.


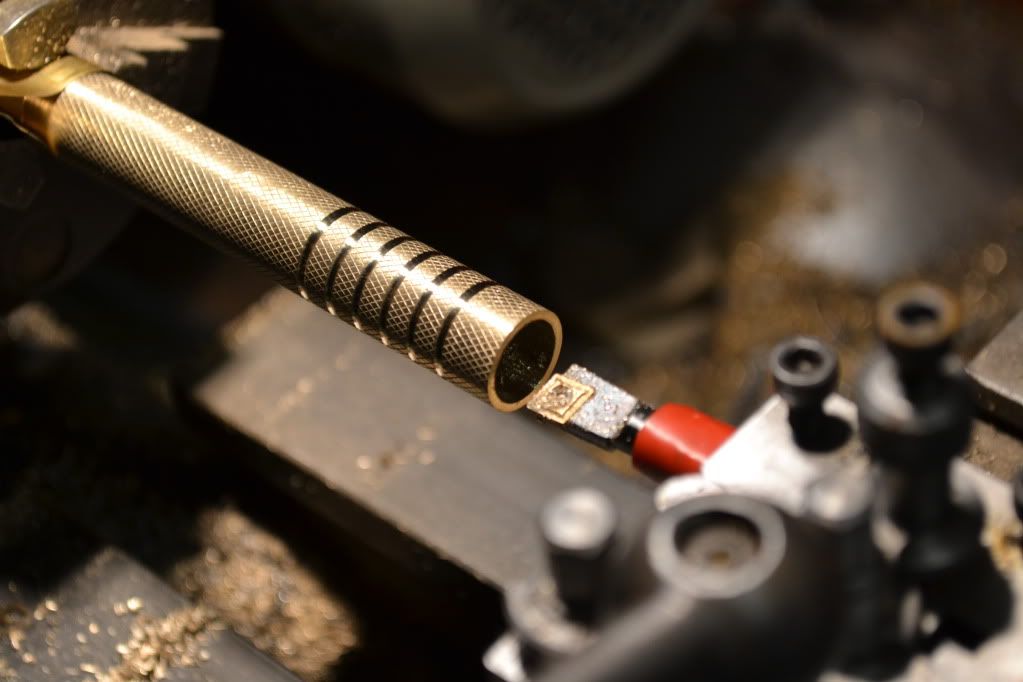
I always drill as much as possible before using the boring tool for two reasons:
1. Because drilling does not place a lateral force on the work,
2. the boring tool won't fit in a hole smaller than 12mm diameter.
The central bore is only 11mm so can just be drilled to that size but the end flair needed to be wider so i drilled that section out to 12.7mm diameter (the biggest drill bit the chuck can take) the finish off very gently with the boring tool.
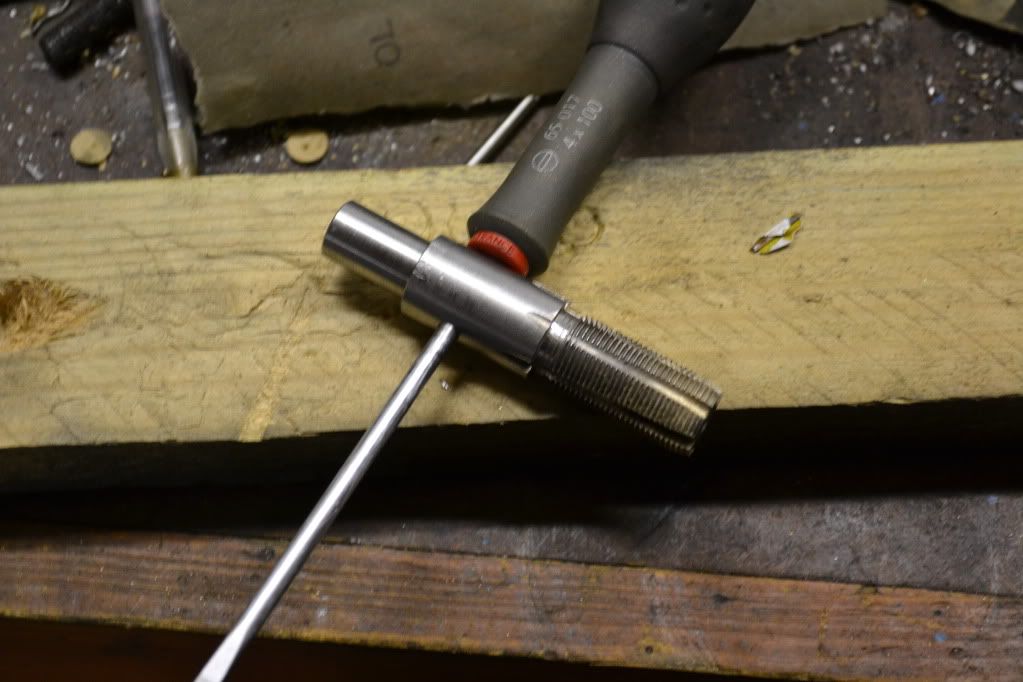
Tapping.
I could have used an internal thread cutting tool but i don't like to so i made a tap out of some scrap steel, it's not hardened as brass is still relatively soft.


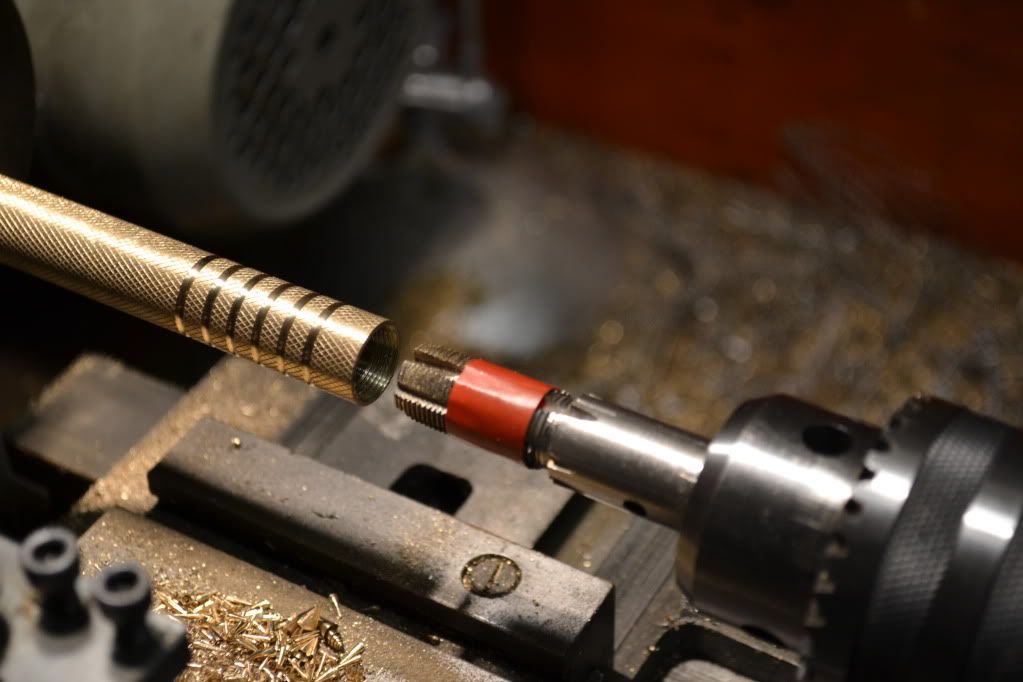
The chuck the tap is mounted in is a tapping guide tool; it has a shaft in the back which slides into a tube behind it which allows it to move forward and back freely while keeping correct orientation  with the work. With a tap this size it requires alot of torque to cut deep which cant be easily provided while on the guide tool.


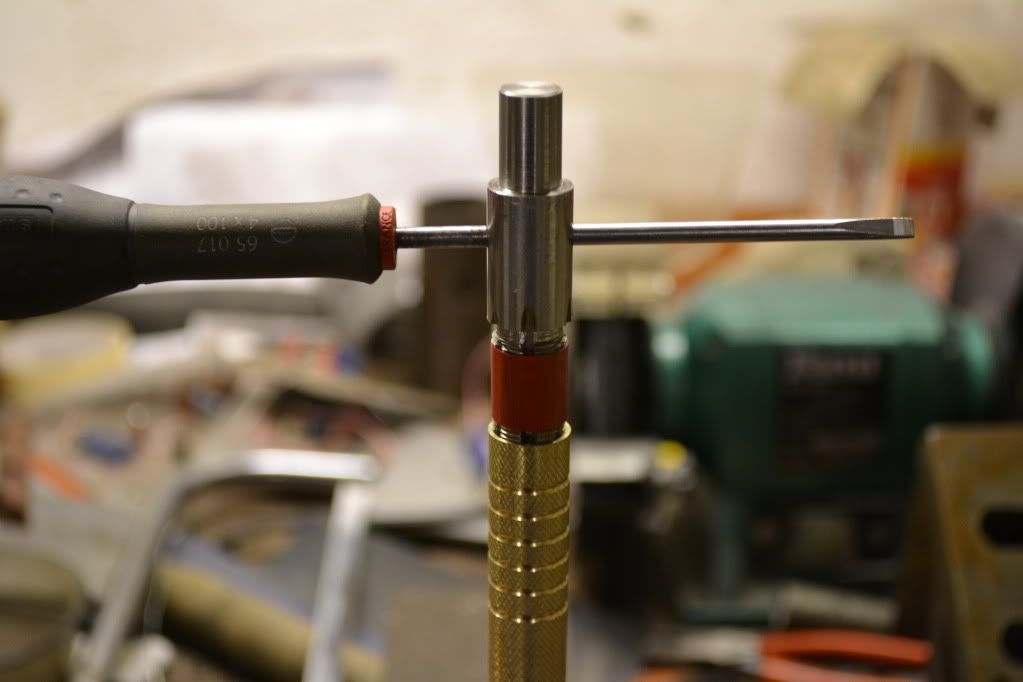
Once a few turns are made the tap will stay true and brute force can be used to finish up.


Cutting the o-ring channels.
This is a simple process but requires a close eye on tolerances as oversized channels render o-rings less useful and the channels are the thinnest part of the torch body so an overly deep cut can ruin the work piece entirely by going right through it.


External threading.
For small threads a die can be used on a lathe using a die guide which is similar to the tap guide and mounts in the tail stoke but for larger threads it's best to cut them with the lathe.
I forgot to take any photos of this but there's not much to see anyway.
It's all a matter of getting the lead screw (which drives the tool post forward and backwards) to move at the correct speed relative to the spinal speed, this is done by connecting the two devices with a complex arrangement of gears.
Using the gear combinations almost any TPI or thread pitch can be cut with a fine pionted 60 degree cutting bit. Always turn slowly and take shallow cuts, sometimes even making several passes at the same depth.

Parting.
Cutting off the work piece from the larger stock is done with a thin cutting tool and is a real pain on harder metals. Luckily brass is really easy so it only takes a moment. Copper on the other hand is terrible as it melts when cut, flowing behind the blade and causing it to jam, making an awful mess.

Cutting the flats on the body.
With the right tools this job was really easy which suprised me a bit as i wasn't looking forward to it at all.


My new rotating table and tail centre allow accurate cuts that are unachievable without it.
Before i was using a v block to hold rod and if i wanted to cut holes around the rod i had to release it, turn it manually and try and realign it by eye which wouldn't be accurate to 5 degrees.
the 45 degree edged slot mill is another great tool which cuts the nice slopes on the edge of the flats.

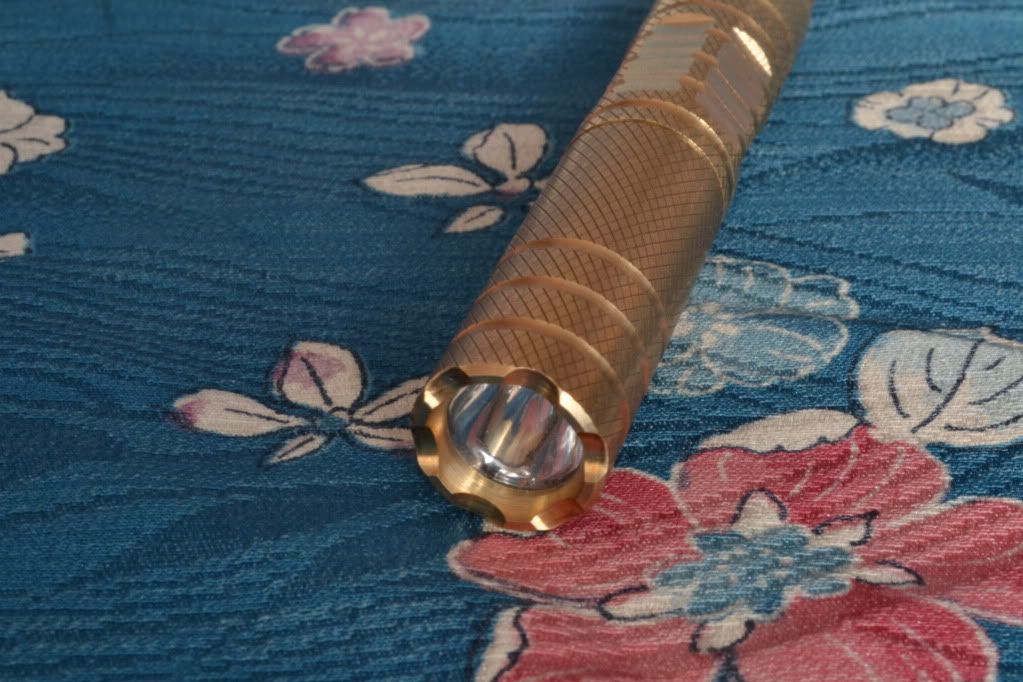
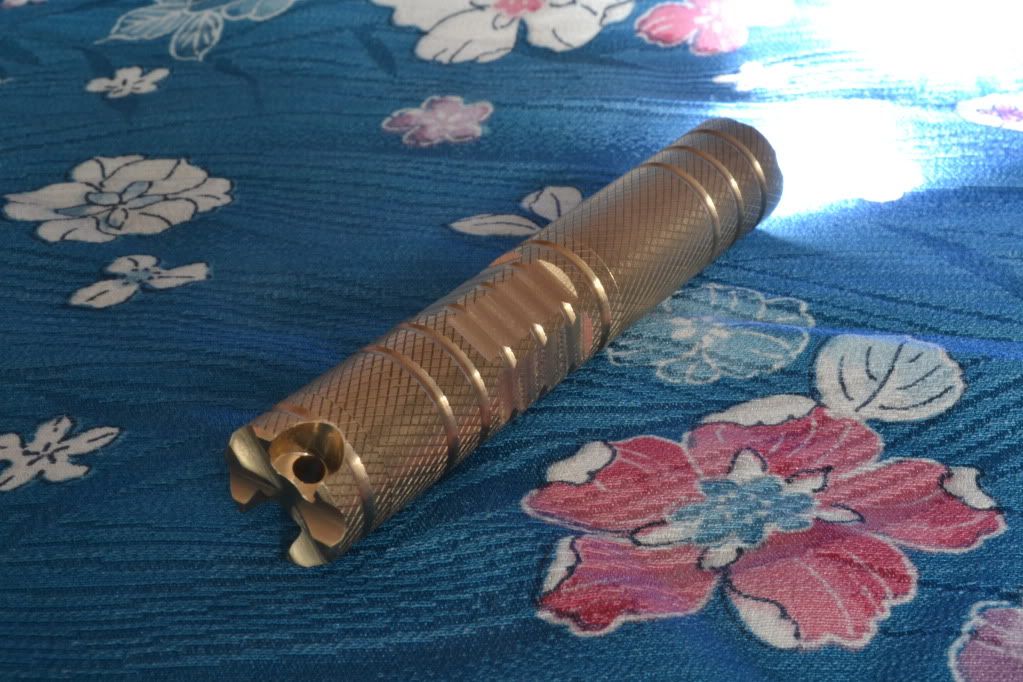
I'm not sure how clear or even interesting all that is so here are some crisper pictures of the finished torch:


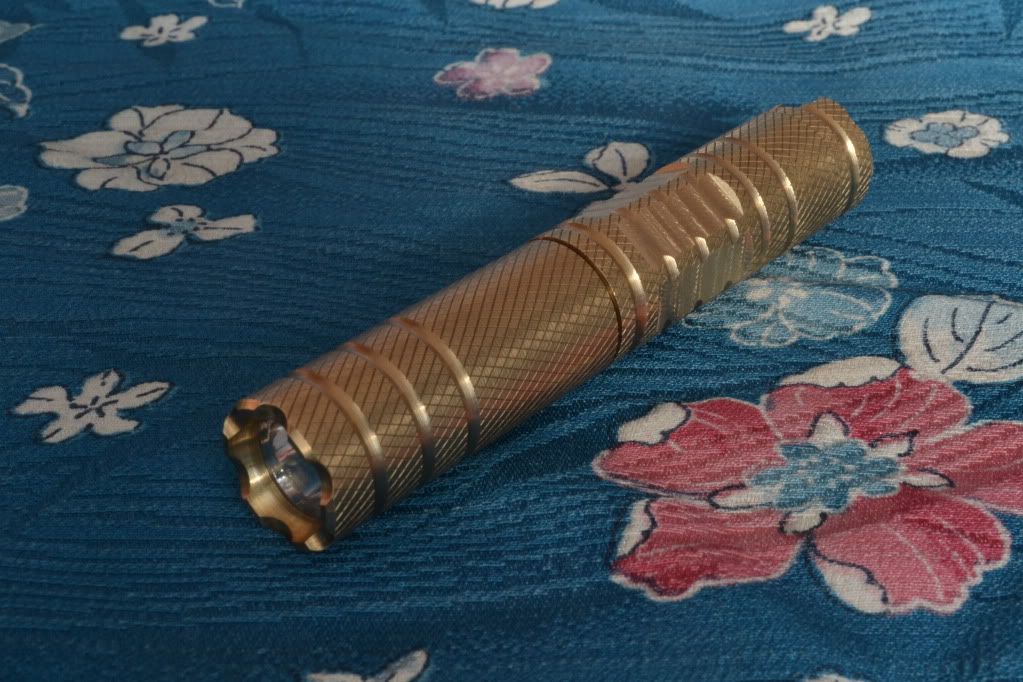
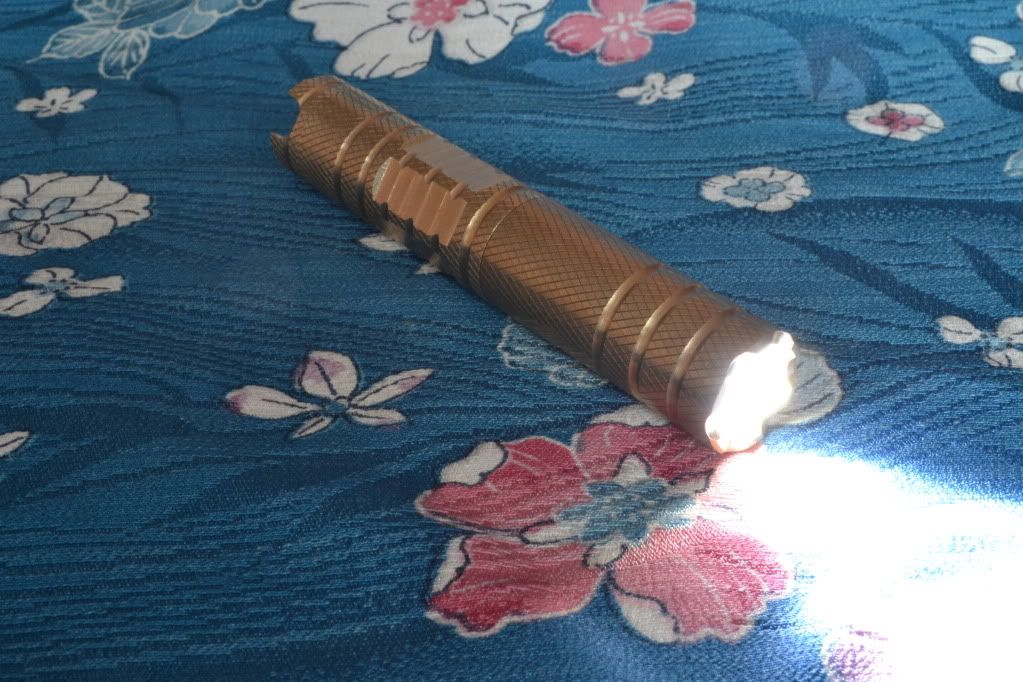
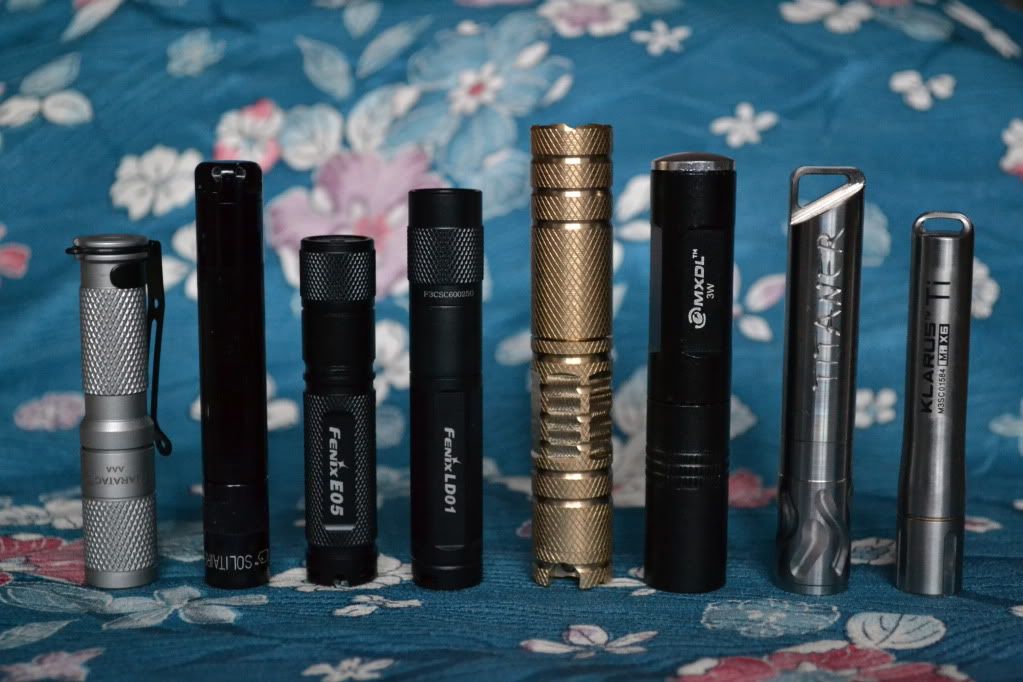
When compaired to other AAA keychain torches it's really shown up as to how large it is.
When peak make their torches available to everyone i look forward to getting hold of one of their brass eiger models (probably the qtc version) which looks much better and would still be cheaper alternative were i to sell these, which i won't as it's not worth it.

Looks alright though.
Pictures of most of my work can be found on my Facebook Page.
Also have a look at my Shapeways Shop and SW Torch Shop for 3D printed items.


gb Offline Sparky415

  • Zombie Apprentice
  • ********
    • Posts: 12,996
Re: Brass AAA Custom Shell (WIP)
Reply #26 on: January 03, 2012, 09:53:04 PM
Thats beautiful Tofty  :salute: the pictures show how much work and time goes it to making something like this
 :cheers:
Everything’s adjustable


cs Offline edcgear

  • No Life Club
  • ******
    • Posts: 3,570
Re: Brass AAA Custom Shell (WIP)
Reply #27 on: January 03, 2012, 10:10:35 PM
Oh man thanks for "how it's done" pics!! Hat off to you sir!!
ΜΟΛΩΝ ΛΑΒΕ
There is method to my madness....
http://svakodnevnesitnice.blogspot.com/


england Offline Benner

  • Global Tuffy
  • *
  • Absolute Zombie Club
  • *********
    • Posts: 28,081
  • Just Awesome! And a Slayer of Polar Bear!
Re: Brass AAA Custom Shell (WIP)
Reply #28 on: January 03, 2012, 11:49:14 PM
That is very very impressive indeed  :cheers:
I'm back!!


gb Offline Tofty

  • *
  • Hero Member
  • *****
    • Posts: 537
Re: Brass AAA Custom Shell (WIP)
Reply #29 on: January 30, 2012, 07:58:51 PM
A short while ago i was thinking about the brass torch and just how long it had taken to make. I then thought about all the ways in which it's manufacture could be simplified by removing some of the cosmetic features and redundant design.

I then went into the workshop and with a few bits of scrap brass from the previous built i was able to knock this up in an evening:


By removing the knurling and not having a seperate end cap not only was it quicker to make but is smaller and lighter than the original torch.

I think i'll have another go at the lanyard hole design and then perhaps a give-away might surface.
Pictures of most of my work can be found on my Facebook Page.
Also have a look at my Shapeways Shop and SW Torch Shop for 3D printed items.


Donations

Operational Funds

Help us keep the Unworkable working!
Donate with PayPal!
April Goal: $300.00
Due Date: Apr 30
Total Receipts: $152.99
PayPal Fees: $8.68
Net Balance: $144.31
Below Goal: $155.69
Site Currency: USD
48% 
April Donations

Community Links


Powered by EzPortal