Multitool.org Forum
+-

Hello Lurker! Remove this ad and much more by logging in.


Re: First mod - mini Farmer with scissors

harryf3 · 59 · 37158

gr Offline harryf3

  • Jr. Member
  • **
    • Posts: 88
Re: First mod - mini Farmer with scissors
on: June 09, 2011, 03:12:19 PM
Here we go.
Here are my basic modding tools.


A friend has a lathe so we made two rivet tools.


The first donor is a “my first victorinox”. Dismantling
.


Making a starting hole with the awl of the soldier.


Drilling


There is a proper hole on the teflon working surface to accept the other side of the rivet.


Punching


The head of the pin appears


Taking the pin out with the pliers.


Here is the last pin. All it needes is to file the head and punch it


Here are the parts


A drawing helps so we know what goes where.


Preparing a few pins


gr Offline harryf3

  • Jr. Member
  • **
    • Posts: 88
Re: Re: First mod - mini Farmer with scissors
Reply #1 on: June 09, 2011, 03:13:03 PM
I made a test with the scales of a cheap Bantam to see how the rivet tools work.


I painted the scales with a permanent marker so I could see any little scratch.

Works great but it’s very difficult to hold the scales parallel to the ground and give precise hits with the hammer.
Those tools need a press so I decided not to use them.
I tried to use only one and put the scales on a anvil with a hole but it’s also difficult.
I had to hit strongly with the hammer and the scales were in danger. So I gave up the idea of the rivet tools.

For practice I made a Lumberjack.


gr Offline harryf3

  • Jr. Member
  • **
    • Posts: 88
Re: Re: First mod - mini Farmer with scissors
Reply #2 on: June 09, 2011, 03:14:21 PM
Dismantling the new orange Cadet.

I do not have a pillar drill so I used the hole of a small cutter as a guide. We do not want the drill to slip and hurt the alox scales.


Punching


Cadet no more. Now there is no turning back.


gr Offline harryf3

  • Jr. Member
  • **
    • Posts: 88
Re: Re: First mod - mini Farmer with scissors
Reply #3 on: June 09, 2011, 03:15:07 PM
Making an awl from the nail file.


Removing much metal with the wannabe dremel to give the basic shape of the awl.


Filing


Sharpening with a DC4


This is it. A combo awl / nail file.


Preparing the 3 brass pins with my old trusty american ball peen hammer and a vice.


gr Offline harryf3

  • Jr. Member
  • **
    • Posts: 88
Re: Re: First mod - mini Farmer with scissors
Reply #4 on: June 09, 2011, 03:16:14 PM
The discontinued small Climber with scissors arrived and we are back in business.
I’m afraid that the SAK collectors will not appreciate the dismantling of a discontinued and collectible SAK but I do need the scissors so please I need your understanding.


A fistful of parts.


Nice and neat so we know again what goes where.


A drawing is always better that a picture because two backsprings are almost identical.


Here are the drawings of the Cadet and the test-Lumberjack.


Too many parts.


The “small Climber” was well used and some  backsprings, liners and tools were dirty or scratched but  the green compound will polish them.


Like new


gr Offline harryf3

  • Jr. Member
  • **
    • Posts: 88
Re: Re: First mod - mini Farmer with scissors
Reply #5 on: June 09, 2011, 03:17:01 PM
Assembling.

First I used the scales of the Bantam to see if everything is working nice, tight and smoth and if I used the right liners.
I used a jig.
Inserting the backsprings, layers and tolls one by one.


The pliers help to open the backspring. The liners are aluminium so they are soft and it’s very easy to hurt them so I protected them with a sponge.


Everything looks and works fine so we can now tranfer everything to the orange scales.


gr Offline harryf3

  • Jr. Member
  • **
    • Posts: 88
Re: Re: First mod - mini Farmer with scissors
Reply #6 on: June 09, 2011, 03:18:08 PM
Orange scales

I cannot use the jig anymore because I have 3 pins ready with round heads.

I found that it’s very easy to put everything in place without a jig or pliers.
All we have to do it to hold the tool, raise the tip and push the backspring at an angle at the same time. It’s really too easy.

So let’s assemble the new and final orange SAK.


Ready but not pinned.


The tape holds tight eveything in place so the knife will not explode during the pinning/riveting process.


gr Offline harryf3

  • Jr. Member
  • **
    • Posts: 88
Re: Re: First mod - mini Farmer with scissors
Reply #7 on: June 09, 2011, 03:18:44 PM
Those magical little stickers in layers of 6 or 7 will prevent the scales from the hammer.


The exposed pin must have the correct size and be even (not pointy).


Or we can use a piece of leather or an elastic tube from bicycle tyres.
I stole this great idea from mister Desax who used rubber pieces..


I made a small round hole on the vice. This will be my bucking bar.
Backup is everything when riveting.
The head will take the shape of the hole in the backing bar no matter what.
Needless to say that I covered with the stickers BOTH sides of the pin or the vice will hurt the scales.


You already know the result from the first post.


I could avoid a few steps of the above but this was my first MOD and it was a complicated one.
I think it’s obvious which steps were not necessary.

I hope you found this useful and interesting.
Thanks for looking
Aris, Greece


gr Offline harryf3

  • Jr. Member
  • **
    • Posts: 88
Re: Re: First mod - mini Farmer with scissors
Reply #8 on: June 09, 2011, 03:27:56 PM
A quick note.
Looks like 1.3 mm was too much for the exposed pin to form a head.
So I over-hitted with the hammer to make the knife tight  and the heads of the pins on the backside of the SAK cracked a little.
Continuous hitting creates brass-dust and cracks.


gb Offline Sparky415

  • Zombie Apprentice
  • ********
    • Posts: 12,996
Re: Re: First mod - mini Farmer with scissors
Reply #9 on: June 09, 2011, 06:07:23 PM
Aris/Harry
Thank you very much for all the pictures  :salute: and I really like the look of those rivet tools  :drool:

Very nice work :cheers:
Everything’s adjustable


sk Offline Doctor.Skipper

  • Jr. Member
  • **
    • Posts: 75
  • Learning is funny!
Re: Re: First mod - mini Farmer with scissors
Reply #10 on: June 09, 2011, 06:30:43 PM
harryf3:
Well, well done - absolutely amazing course!  :salute: :tu:
I have never seen so clear "evolution" of the knife modding.
Working Hard - Expecting More
Dr.Skipper (ibu)


gb Offline nuphoria

  • Ambidangerous Mistress of Mod
  • Admin Team
  • *
  • Zombie Apprentice
  • *
    • Posts: 15,038
  • I'm not all bad, I'm just drawn that way.
Re: Re: First mod - mini Farmer with scissors
Reply #11 on: June 09, 2011, 06:36:08 PM
Excellent photos essay - I vote we make it a sticky :D
A dyslexic man walks in to a bra...

All my music for free: http://soundcloud.com/chrissyvandyke


scotland Offline Gareth

  • Admin Team
  • Point Of No Return
  • *
    • Posts: 36,707
Re: Re: First mod - mini Farmer with scissors
Reply #12 on: June 09, 2011, 07:01:50 PM
great pics mate, cheers for sharing. :cheers:
Be excellent to each other and always know where your towel is.


au Offline MultiMat

  • *
  • Absolutely No Life Club
  • *******
    • Posts: 8,694
  • The MTO handshake.
Re: Re: First mod - mini Farmer with scissors
Reply #13 on: June 09, 2011, 07:13:44 PM
harry , that is ............ just wow ......... wow  :salute: :salute: :salute:.

I would love to see a video of the final peening of the pins, that would be very cool , I have looked on Youtube with no luck.

Getting the peening just right so the tightness in the SAK is spot on has to be tricky  :think: :think: :think:.

GREAT photos , GREAT project & GREAT SAK mate  8) 8) 8) :D :D

"Downunder Mod (that sounds dirty, doesn't it?)"
Yeh Baby :P >:D >:D


hr Offline enki_ck

  • Global Moderator
  • *
  • Absolute Zombie Club
  • *
    • Posts: 20,904
  • I may get older but I refuse to grow up.
Re: Re: First mod - mini Farmer with scissors
Reply #14 on: June 09, 2011, 08:02:46 PM
Excellent photos essay - I vote we make it a sticky :D

+1 and maybe add it to the main site and the SOSAK in the next newsletter too.

Great work. Inspired me to try the same.


gr Offline harryf3

  • Jr. Member
  • **
    • Posts: 88
Re: Re: First mod - mini Farmer with scissors
Reply #15 on: June 09, 2011, 09:52:04 PM
Thank you for your kind words ladies and gentlemen.
I’m very glad that you found my thread useful.

This is a how we set a rivet and make the head round.
Remember: BACKUP IS EVERYTHING.


And some very useful reading:

http://www.thefullwiki.org/Rivets

http://www.iknifecollector.com/forum/topics/modifications-personalizing?groupUrl=kniferepairrestorationupgradegroup&id=3181080:Topic:107283&groupId=3181080:Group:103562&page=6#comments

http://www.bladeforums.com/forums/showthread.php/701748-Sharp-edges-on-peened-rivets

http://www.homemodelenginemachinist.com/index.php?topic=4335.15

http://www.mtfca.com/discus/messages/80257/82578.html?1235094026

http://www.hellboxarmory.com/mm5/merchant.mvc?Screen=PROD&Store_Code=HBA&Product_Code=AKRFS&Category_Code=AKtools

http://www.snydersantiqueauto.com/modelaparts/rivetsrivettools

The Advanced Knife Makers Manual


I may make a black alox farmer with scissors for a friend next month and I’ll try to focus on details about riveting.
This is the most difficult part when customizing an alox SAK.
All the other steps are quite easy and all we have to do is to be methodical.

To be honest I’m not very satisfied with the rivets on the orange mini farmer of this thread. Experience is something we cannot buy. I hope my next project will be better.

All the best
Aris


sk Offline Doctor.Skipper

  • Jr. Member
  • **
    • Posts: 75
  • Learning is funny!
Re: Re: First mod - mini Farmer with scissors
Reply #16 on: June 10, 2011, 11:29:27 AM
Very useful links and information!
Many thanx - I would need just it!

Doc.Skipper
Working Hard - Expecting More
Dr.Skipper (ibu)


at Offline Woz

  • No Life Club
  • ******
    • Posts: 1,176
Re: Re: First mod - mini Farmer with scissors
Reply #17 on: June 10, 2011, 03:19:01 PM
Great work! I'm not talented enough to build my dream SAK, but maybe sometimes I will have one modded by a gifted modder like you. Very nice!
edc-reviews.blogspot.com


gr Offline harryf3

  • Jr. Member
  • **
    • Posts: 88
Re: Re: First mod - mini Farmer with scissors
Reply #18 on: June 10, 2011, 05:45:24 PM
A very simple turorial with animation. Press the yellow button.

http://hognosesam.co.uk/JoiningMetalsRivets.aspx


scotland Offline Gareth

  • Admin Team
  • Point Of No Return
  • *
    • Posts: 36,707
Re: First mod - mini Farmer with scissors
Reply #19 on: June 10, 2011, 08:01:40 PM
I hope you don't mind Aris, but the rest of the mods and I felt there was some excellent info on page 2 and 3 of your thread so we decided to make it a 'sticky'. :cheers:
Be excellent to each other and always know where your towel is.


us Offline Pacu

  • *
  • *
  • Absolutely No Life Club
  • *******
    • Posts: 5,514
Re: First mod - mini Farmer with scissors
Reply #20 on: June 10, 2011, 08:48:20 PM
awesome show of skill..   :cheers:
:like:    :MTO:


gr Offline harryf3

  • Jr. Member
  • **
    • Posts: 88
Riveting - Mistakes and Tools
Reply #21 on: June 11, 2011, 01:50:21 PM
When I started the modification of the alox Bantam I faced all kind of problems and I made any possible mistake.
I thought I was well prepared because I studied much about modding and rivets.

Theory is invaluable but when we go to the workshop things look different.
We can play war games all day long in the computer but when in the field of at the shooting range our weakness and lack of experience betray us.

Modding alox SAKs is all the rage. Alox does not forgive mistakes and our work is exposed. The are no cellidor scales to cover the poor workmanship.

I’ve studied a lot about rivets and rivet setting before getting started. Riveting is the most difficult part when modding an alox SAK and can lead to fatal errors.
Everything else is reversible but mistakes when riveting may destroy our work.

So let’s get started. We’ll use the destroyed Bantam for demonstration.


When things go bad

We missed the Center of the rivet

It was not our lucky day, meaning we were careless and hasty.
We tried to remove the rivet of the scale-donor with the drill and punch method but we had a slip and the drill drilled the alox scales near the rivet.


If that happens to the Bantam we just throw it away and get a new one.
But what if we drilled wrong our beloved, expensive and discontinued blue farmer?

No matter how loud we cry and curse, the hole will be there forever and we can not call this “character”.

Without a press we cannot make the head of the new rivet wide enough to cover the hole. The head of the rivet will eventually crack and break if we try to make it extra wide.
So our project failed before it even started.

But there is still something we can do.
One of our donors is probably a cellidor SAK. And after we disassembled it we had those spare rings:


Maybe we can use them to correct our mistake.
Let’s do this.

This is the drawing of the ring:


We widen the hole and insert the ring. This will support the rivet.


We set the rivet on the other side:


If we use our ball peen hammer with a little patience we can make the ring/rivet system to look like a massive rivet. One body one soul:


I think it’s better to have a rivet with a big head that to have a hole near the rivet.

The diameter of that head is 5mm. A normal one would be 3mm. Anyway a 5mm head is not that huge after all. And finally we convince our selves that we’ve made a rivet and knife with “character”, one of a kind etc.

Conclusion

We better use a guide or even better a vertical base for the drill. There are bases with a vice which hold the knife securely.
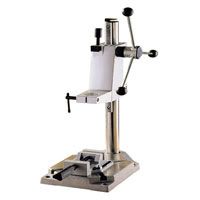
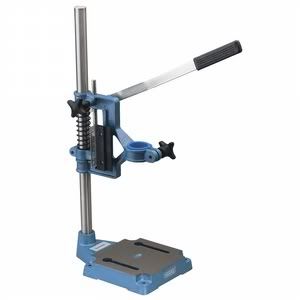


The knife explodes

We forgot to tie the knife with tape and it exploded.


There is no need to remove the already set rivets and start from the beginning.
With a thin screwdriver or something similar we can push the backspring and the blade goes back to the right position.


If we are making a SAK with 3 or 4 layers this is tricky but we will get there eventually.


The exposed part of the pin which will form a round head is too long.

If we keep on hitting with the hammer this will lead to a rivet with cracked head because of metal-fatigue. And after too many strkes the possibility to hit the scales is raising dramatically. Also the finished knife will most likely have a noticable horizontal blade play.

We better shorten the pin with a file. If we have already started and have a nice round head say 0.7 or 1mm away from the scales then it’s better to file the head or a part of it and then continue with the hammer.


The finished knife is too tight and the blades do not close with the backspring action.
We oil the joints and see if it improves.
If not we open an opener and stretch it horizontally. This will stretch the rivet a bit and this is enough in most cases.


Not all parts (scales, backsprings, blades) are on the same axis.

This is caused because of a wrong hole (not fully centered) or a bent pin.
That will maybe lead to a blade which does not fully opens and this is an accident waiting to happen.

We can baton with the knife with care and not much force. We do not hit the spine near the tip or in the middle but near the pivot. A few light hits and we try the blade and so on.


This will bend the brass pivot/pin slightly and the blade will fully open.
If the problem is a big one or if we baton too hard, then we’ll finally have a noticable vertical blade play.


If we are working with black alox scales and scratch them, there is a nice product for black anodizind.


I have used it to anodize black flashlights and aluminium gun parts and works great. However it doen’t give a hard anodizing but only a very thin and quite sensitive anodized layer.


Our limits

If you are a novice like me and you’ve made an acceptable and functional rivet and you notice that you do not see a serious improvement any more then stop!
We may think that with a few more hits with the hammer we’ll make that rivet perfect.
Well, the possibilities are that we’ll crack the head or hurt the scales. Besides excessive hitting may lead to a bent pivot and the blades will lose the initial axis.

The difference between an acceptable rivet and a perfect one is not just a few hits but few months or years of experience.
Let’s face it, we are not Scibeer and we better be happy with what we’ve achieved.

As an engineer and remote control model airplane modeler I’ve seen too many damaged projects for the sake of perfection.


gr Offline harryf3

  • Jr. Member
  • **
    • Posts: 88
Re: Riveting - Mistakes and Tools
Reply #22 on: June 11, 2011, 01:53:11 PM
Hand rivet tools

Rivet squeezer


This is the most advanced and precise tool.

It is used in aircraft industry.

The tool together with the dies may cost $150-200 or more.
If we are modding SAKs on a regular basis then this is maybe a good investment.

If you are like me and just want to make your dream SAK, then make another 2 or 3 for your buddies and then quit, that tool is probably not an option.


U-clamp squeezer


This is usually a custom made press/squeezer made from a U-clamp.
The end of the screws must have a proper concave hole to form the head of the rivet.
This hole is easily made with a round drill.


Rivet punches


Like the ones I’ve made with a lathe.
If we adapt them to some kind of custom made press or guide for hammering then this tool is excellent.
Just hitting with the hammer is dangerous and it will eventualy hurt the scales.


All rivet tools require that the excess rod which will form the head of the rivet has the right size.
If it’s too short the die will not form a complete head and will eventually hit the scales of the knife.
If it’s too long we’ll have a metal “flow” outside of the die or the pin will bend.


Ball peen hammer


The well known basic tool for making a round head rivet.
Widely discussed in the forum.


Screw posts


I’ve searched the world to find the proper size for my mini-Farmer project but couldn’t find 2.2 mm screw posts.

The thinnest I found was 5mm brass screw posts and solid brass extensions


This was my second and possibly the last contribution to the mod squad as this is all the knowledge I have about modding a SAK so far.
I cannot see how we can make our custom alox SAK better.
The rest is experience and experimenting.

Once again I hope you found it useful.

all the best
Aris, Greece


gb Offline Sparky415

  • Zombie Apprentice
  • ********
    • Posts: 12,996
Re: Riveting - Mistakes and Tools
Reply #23 on: June 11, 2011, 01:59:34 PM
Another great post  :salute:
 
And a very good idea for correcting a mistake  :tu: (better than throwing it at the garage door   ::) )
Everything’s adjustable


um Offline Mr. Whippy

  • Global Moderator
  • *
  • *
  • Zombie Apprentice
  • *
    • Posts: 12,170
  • North American Meetup: May13-15 2011
Re: Riveting - Mistakes and Tools
Reply #24 on: June 11, 2011, 02:04:24 PM
Fantastic primer!

Thank you for putting this together! :cheers:


au Offline MultiMat

  • *
  • Absolutely No Life Club
  • *******
    • Posts: 8,694
  • The MTO handshake.
Re: Riveting - Mistakes and Tools
Reply #25 on: June 11, 2011, 03:23:05 PM
Looks like a great save mate  :salute: :salute: :salute:.

Another terrific post mate  :tu: :tu:

"Downunder Mod (that sounds dirty, doesn't it?)"
Yeh Baby :P >:D >:D


sk Offline Doctor.Skipper

  • Jr. Member
  • **
    • Posts: 75
  • Learning is funny!
Re: Riveting - Mistakes and Tools
Reply #26 on: June 11, 2011, 04:39:00 PM
harryf3
Another perfect post! You sholuld issue it as paper or hardback  :tu: :tu:
 :salute:
Working Hard - Expecting More
Dr.Skipper (ibu)


us Offline 82brutus

  • Hero Member
  • *****
    • Posts: 968
Re: Riveting - Mistakes and Tools
Reply #27 on: June 12, 2011, 01:02:26 AM
This is a fantastic post!  Thanks for sharing the knowledge!  :cheers:

Martin
“We shall neither fail nor falter; we shall not weaken or tire...give us the tools and we will finish the job.” - Winston Churchill


us Offline tattoosteve99

  • *
  • Absolutely No Life Club
  • *******
    • Posts: 6,316
Riveting - Mistakes and Tools
Reply #28 on: June 12, 2011, 03:15:09 AM
Very useful info. Especially for us "newbies" into the SAK mods.
If I remember correctly, wait, what was I saying?


cz Offline Rahmed

  • Sr. Member
  • ****
    • Posts: 412
Re: Riveting - Mistakes and Tools
Reply #29 on: June 12, 2011, 10:21:54 PM
 :cheers:Thanks for the valuable informations, Aris :tu:


Donations

Operational Funds

Help us keep the Unworkable working!
Donate with PayPal!
April Goal: $300.00
Due Date: Apr 30
Total Receipts: $152.99
PayPal Fees: $8.68
Net Balance: $144.31
Below Goal: $155.69
Site Currency: USD
48% 
April Donations

Community Links


Powered by EzPortal