I promised to gift a very special person a leather belt. Now I hadnt done a leather belt in a couple of years, and with the last leather piece done not that long ago, I figured it would be a good thing to get back into the swing of things in regards to leather crafting. Thankfully, much like riding a bicycle, you just never forget the basics. Still a little rusty in some of my techniques, and I know that comes from lack of practice
but the foundations are still there. Whew!
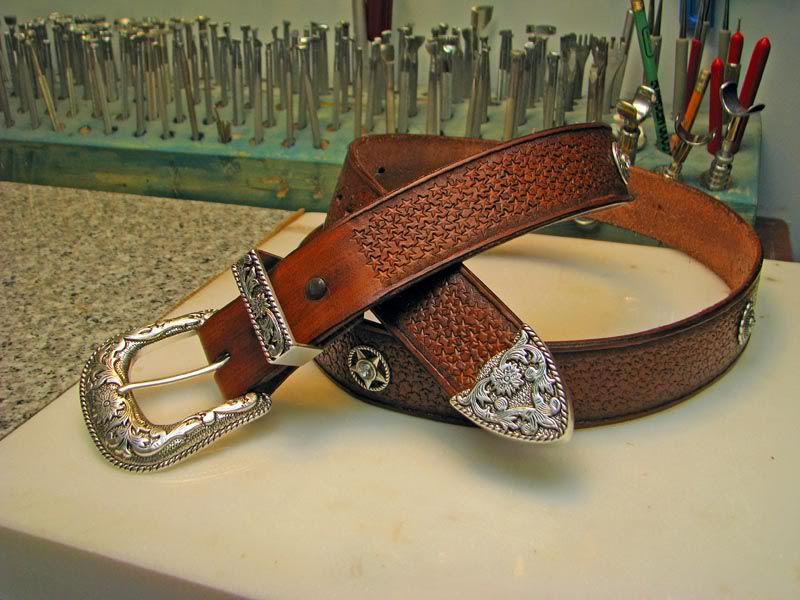
Anyways, my idea behind this project, was to highlight some of the owners qualities. A love of astronomy is shown in the simple but time consuming star background. A love of geology is evinced in the crystal centers. Likewise, each of the 5 evenly spaced crystal backdrops is different, but each signifies something about the person.
Enough babbling and onto the photos. I am going to attempt to show you the steps I took to make the belt.
1. I used a belt blank for this project. These come with the two snaps already pre-fitted and the belt comes a standard length that is trimmed to your needs. The first step is to use a specialized tool that turns a swivel knife into a line cutter. Simply run the blade along the belt being sure to only press lightly so as to not cut more than half way through the belt.

2. I next use a belt tip cutter to shape the squared off tip. This will allow better fitting of the belt tip protector later on. At the same time, I use a #2 Edger tool to round the front and back side edges. I run this tool along each edge corner. This makes the belt a lot more comfortable to wear
and also aids in the finish that will come later.

3. Now comes the long stamping part. Here you can see the small star stamp and my stamping mallet. You have to wet the leather first which makes the leather easier to imprint.

4. After completing the stamping part, I then cut the holes in the belt for the belt buckle. I always use a special oval punch. Round holes dont allow the buckle bar to work properly. The needle is there to clean out the leather punch after each strike.

5. I then re-wet the leather and used this stamp to push the leather down on the inside, producing a nice edge effect to the belt. At the same time, I measured the belt and punched 5 holes for the crystal rivets and shields using a small round punch.

6. This next step is very important. I use natural Neatsfoot oil and apply a liberal amount to both sides of the belt. This oil impregnates the leather and reconditions the belt. After this application, you have to work it in by bending the belt a few times etc. I let this soak in and dry before going to the next step. The oil does darken the leather FYI.

7. Next I use a specialized slicker to finish the edges. The slicker is nothing more than a nylon round pulley. I sometimes attach the slicker to a rotary tool, and hence the metal shaft, but I usually use it by hand most of the times. To use the slicker, you have to wet the edges with water and then rub the slicker over the edges repeatedly. There are different techniques for this, but I prefer simple water. The oil also aids in giving you a nice professional edge to your belt
hence why I do this after the oil application.

8. Now comes the dying of the belt. I used a medium brown dye. I rub some dye on the belt and then quickly rub it away with a wet sponge. This way, it dyes the crevices but leaves the foreground lightly dyed. I didnt take any photos because I had to wear gloves. This step is always messy.
9. Next, fit the belt tip protector and hardware for a dry fit. Trim where needed and then using a metal stylus, I gently tap my holes into the screw holes and then install the belt tip protector.

10. With the hardware in place, I then finish the belt with an acrylic clear coat sealer. It goes on white but dries clear after a few minutes. This seals all the dyes so that it wont come off on the wearer, and also protects the piece from moisture. Once dry, I take a dry cotton rag and buff the belt.

Well that is it. The belt took me about 5 hours to make. Here is the finished product.

I hope you enjoyed this quick rundown on my techniques in making a leather belt.


