Skip to content
Collapse
? [[global:guest]]
Unread Recent
HOME SEARCH PROFILE MESSAGES 0 BOOKMARKS MEMBERS BADGES
Multitool.Org Forum
MultiTool.org • Community Header Space • Watch This Space

Newbie modding SAKs

Scheduled Pinned Locked Moved The Mod Squad
117 Posts 1 Posters 17.5k Views
  1. Home
  2. The Mod Squad
  3. Newbie modding SAKs
Newbie modding SAKs
  • Oldest to Newest
  • Newest to Oldest
  • Most Votes
Reply
  • Reply as topic
Log in to reply
This topic has been deleted. Only users with topic management privileges can see it.
  • sLaughterMed Offline
    sLaughterMed
    Posts: 3,450
    sLaughterMed Offline
    sLaughterMed
    wrote on last edited by
    #14 Quote Reply

      @Sparky415 said:
      Interesting stuff M

      +1

      Laughter is the best Medicine
      Slaughter is just Laughter with an "S"

      We are looking for Multitool Encyclopedia Editors! If you are interested, please give me a PM!

      The Multitool Encyclopedia Editing for Dummies Page: http://forum.multitool.org/index.php/topic,65751.0.html
      Multitool Encyclopedia Suggested Edits Page: http://forum.multitool.org/index.php/topic,65746.0.html

      Merit Badges
      SAKWiki User SOG Power Challenge Hacker Multitool Encyclopedia User EDC Pocket Dump Challenge BO Tools Level 2 Santa Ignore MP600 Collector
      1 Reply Last reply
      • SteveC Offline
        SteveC
        Global Moderators
        Posts: 72,315
        SteveC Offline
        SteveC
        Global Moderators
        wrote on last edited by
        #15 Quote Reply

          Very cool :tu:

          Merit Badges
          Fishing Mod User Hacker Photographer Fire Making BO Tools Level 3 Discontinued SAK/MT Challenge Traditional Folder Challenge MTo Anniversary Challenge Victorinox Spirit Challenge MTO Rotation Challenge Calendar 2019 Calendar  2018 Calendar   2017 LM Surge Challenge Level 2 The SUPER Challenge GEC Challenge LM Crunch 15 day Challenge Chili Award PST 30 Day Challenge Buck User Calendar 2020 Buck 112 Ranger 30 Day Challenge 30 Blades 30 Days Mr Pinchy Love Bites 14th Anniversary Anything Goes Challenge Buck 110 Challenge LM Rebar Challenge The 30 Day MiniTool Challenge 30 Day Locks Up Challenge 20th Anniversary Anything Goes Challenge 30 Day Barlow Challenge
          1 Reply Last reply
          • m47mu74nt Offline
            m47mu74nt
            Posts: 2,520
            m47mu74nt Offline
            m47mu74nt
            wrote on last edited by
            #16 Quote Reply

              With the angle grinder out for a while, the scale making project is on hold :facepalm: :rant:

              In the mean time, here is a new Ti experiment:
              Heating (flame) with some Salt crystals (table salt) held in place my wetting the Ti plate before applying the salt. Heat gives the bronze color, the salt crystals create the blue dots on the surface

              heat-salt-Ti.jpg

              Meet me also on youtube & instagram for mostly knives (and multitools) content

              Merit Badges
              Scale Changer Hacker Mod User SAKWiki User Duct Tape BO Tools Level 3 Flashlight Paracord Carabiner User Discontinued SAK/MT Challenge Minimal SAK Challenge Titanium Camo SAK Stayglow SAK Zip Tie User Scaler User Birth Year SAK Hook User ALOX with Scissors MTO Tool MTo Store User Jack'O Lantern Badge ALOX Colors Level 3 Victorinox Spirit Challenge Toothpick User Tool Box Challenge  30 Day Vintage SAK Challenge 30 Day Rhymes with Orange Challenge MTo Anniversary Challenge LM Signal Challenge Wenger Collector Level 3 30 Day Ratchet Challenge MacGyver 30 Day Challenge 20th Anniversary Anything Goes Challenge
              1 Reply Last reply
              • m47mu74nt Offline
                m47mu74nt
                Posts: 2,520
                m47mu74nt Offline
                m47mu74nt
                wrote on last edited by
                #17 Quote Reply

                  Part two : drilling and cutting the Ti scales (Classic and Sentry)

                  Pre-drilling through liners :
                  (No, this is not a drill press, but a hand drill on a stand)

                  NB: applying double sided tape long before working is not a good idea, i had some pain to remove the liners without ruining them :facepalm:

                  Drilling done:

                  Time to cut the scales out of the Ti plate: Titanium screams while being cut by the hacksaw...

                  Testing Alignment:

                  Blank testing the Sentry:

                  End of this part for now, still lacks the angle grinder to continue the scales :)
                  *Next is a texture test on Ti that i'm doing right now.
                  *

                  Meet me also on youtube & instagram for mostly knives (and multitools) content

                  Merit Badges
                  Scale Changer Hacker Mod User SAKWiki User Duct Tape BO Tools Level 3 Flashlight Paracord Carabiner User Discontinued SAK/MT Challenge Minimal SAK Challenge Titanium Camo SAK Stayglow SAK Zip Tie User Scaler User Birth Year SAK Hook User ALOX with Scissors MTO Tool MTo Store User Jack'O Lantern Badge ALOX Colors Level 3 Victorinox Spirit Challenge Toothpick User Tool Box Challenge  30 Day Vintage SAK Challenge 30 Day Rhymes with Orange Challenge MTo Anniversary Challenge LM Signal Challenge Wenger Collector Level 3 30 Day Ratchet Challenge MacGyver 30 Day Challenge 20th Anniversary Anything Goes Challenge
                  1 Reply Last reply
                  • m47mu74nt Offline
                    m47mu74nt
                    Posts: 2,520
                    m47mu74nt Offline
                    m47mu74nt
                    wrote on last edited by
                    #18 Quote Reply

                      I hope this step by step WIP isn't too boring, if so, don't worry this is the last part!

                      Part 3: grinding, anodizing, assembling
                      As the angle grinder is back, that's time to shape the scales: grind grind grind

                      Sanding the scale border held together to get an even surface:

                      After sanding a few steps are left before anodizing : drilling bevels in the rivet holes to ease the peening process, breaking the angles on the scale borders
                      and for fun, 3 dead holes to get textured anodizing

                      Anodizing result (step by step of that bi-color and shading process may come later if needed.):
                      Light blue holes : 57V, lemon juice
                      Shading : 34V, lemon juice

                      Blank testing (yeah, i should have done that before... at that point the spring is a little recessed behind the scales on the back. Let's say "it's not a bug, it's an undocumented feature"
                      Note the gold anodized inside

                      Cutting rivets:

                      Shorting rivets with a file, using a small plastic sheet to protect the Ti scales:

                      No pic during peening process, only two hands here :P

                      And the result:
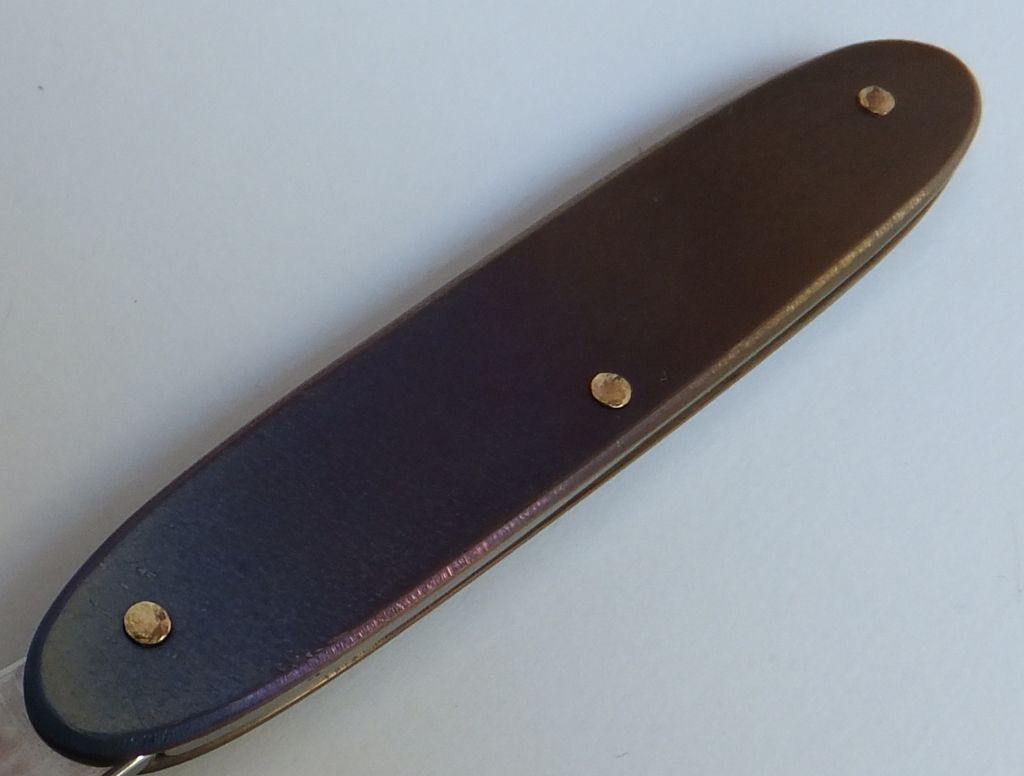
                      Sadly the pics does not render the real colors here.
                      The dots face has the following pattern : light blue dots and scale with violet shading slowly into bronze
                      The other face is blue>violet>bronze>gold

                      Conclusion: :climber: (this gif has far too much tools to represent my build :facepalm:

                      This build is far from 'professional grade' work (lots of small defects that i could have anticipated... and fixed?) but i think that on the overall it worths the time i spent :)
                      This build really lacks the Swiss cross, that i can't do without a milling machine (but it would look great with the bi-color anodized dead holes)
                      What do you think? should i continue this way or did i made horrible mistakes that i shouldn't do ever again?

                      Meet me also on youtube & instagram for mostly knives (and multitools) content

                      Merit Badges
                      Scale Changer Hacker Mod User SAKWiki User Duct Tape BO Tools Level 3 Flashlight Paracord Carabiner User Discontinued SAK/MT Challenge Minimal SAK Challenge Titanium Camo SAK Stayglow SAK Zip Tie User Scaler User Birth Year SAK Hook User ALOX with Scissors MTO Tool MTo Store User Jack'O Lantern Badge ALOX Colors Level 3 Victorinox Spirit Challenge Toothpick User Tool Box Challenge  30 Day Vintage SAK Challenge 30 Day Rhymes with Orange Challenge MTo Anniversary Challenge LM Signal Challenge Wenger Collector Level 3 30 Day Ratchet Challenge MacGyver 30 Day Challenge 20th Anniversary Anything Goes Challenge
                      1 Reply Last reply
                      • Huntsman Offline
                        Huntsman
                        Global Moderators
                        Posts: 5,781
                        Huntsman Offline
                        Huntsman
                        Global Moderators
                        wrote on last edited by
                        #19 Quote Reply

                          @m47mu74nt said:
                          I hope this step by step WIP isn't too boring, if so, don't worry this is the last part!

                          What do you think? should i continue this way or did i made horrible mistakes that i shouldn't do ever again?

                          Step by step: **definitely not ** boring - makes it better and very interesting
                          And all the annodising stuff is fascinating :tu:

                          Result looks great to me

                          Re quality/mistakes - I can't really see any - so I'd say continue
                          I guess if you are going to sell on, then you need to correct the mistakes, if there are any

                          Great work and thanks for the posts

                          Merit Badges
                          Scale Changer OCD Squad Duct Tape Japanese PST Flashlight ALOX Colors Level 2 BO Tools Level 1 Birth Year SAK SAKWiki User Hacker EDC Pocket Dump Challenge ALOX with Scissors MTO Tool MTo Store User Santa
                          1 Reply Last reply
                          • m47mu74nt Offline
                            m47mu74nt
                            Posts: 2,520
                            m47mu74nt Offline
                            m47mu74nt
                            wrote on last edited by
                            #20 Quote Reply

                              @Huntsman said:

                              @m47mu74nt said:

                              I hope this step by step WIP isn't too boring, if so, don't worry this is the last part!

                              What do you think? should i continue this way or did i made horrible mistakes that i shouldn't do ever again?

                              Step by step: **definitely not ** boring - makes it better and very interesting
                              And all the annodising stuff is fascinating :tu:

                              Result looks great to me

                              Re quality/mistakes - I can't really see any - so I'd say continue
                              I guess if you are going to sell on, then you need to correct the mistakes, if there are any

                              Great work and thanks for the posts

                              Thank you for your feedback :-)
                              Bad pictures help not to show flaws :whistle:
                              BTW I won't sell anything, at most those amateur builds will become gifts for friends

                              Meet me also on youtube & instagram for mostly knives (and multitools) content

                              Merit Badges
                              Scale Changer Hacker Mod User SAKWiki User Duct Tape BO Tools Level 3 Flashlight Paracord Carabiner User Discontinued SAK/MT Challenge Minimal SAK Challenge Titanium Camo SAK Stayglow SAK Zip Tie User Scaler User Birth Year SAK Hook User ALOX with Scissors MTO Tool MTo Store User Jack'O Lantern Badge ALOX Colors Level 3 Victorinox Spirit Challenge Toothpick User Tool Box Challenge  30 Day Vintage SAK Challenge 30 Day Rhymes with Orange Challenge MTo Anniversary Challenge LM Signal Challenge Wenger Collector Level 3 30 Day Ratchet Challenge MacGyver 30 Day Challenge 20th Anniversary Anything Goes Challenge
                              1 Reply Last reply
                              • Fortytwo Offline
                                Fortytwo
                                Posts: 1,285
                                Fortytwo Offline
                                Fortytwo
                                wrote on last edited by
                                #21 Quote Reply

                                  @m47mu74nt said:
                                  ...at most those amateur builds will become gifts for friends

                                  Your friends should be happy!

                                  Merit Badges
                                  Scale Changer SOG Power Challenge Fishing Minimal SAK Challenge Victorinox Spirit Challenge Chainsaw User MTo Anniversary Challenge
                                  1 Reply Last reply
                                  • Syph007 Offline
                                    Syph007
                                    Global Moderators
                                    Posts: 9,842
                                    Syph007 Offline
                                    Syph007
                                    Global Moderators
                                    wrote on last edited by
                                    #22 Quote Reply

                                      Good stuff! I like when people do progress pics, its nice to see how people work and step by steps are much more interesting then just posting the final build. In fact many successful blade makers started off and gained popularity specificly because they showed how they do their work. It draws in an audience.

                                      Some things I thought while reading.

                                      The liners are the best templates as you discovered. I use little clamps to hold them on the material then scribe lines around and remove. I used double sides tape before too.. annoying. :D

                                      I didnt realize how much Ti-6-4 hardens when heated so if you are using any method to cut them that involves heat, drill holes first. This really caught me off guard when I made the fold over clip on the mini champ. It was impossible to tap the holes in that scale after it was heated to fold.

                                      I grind/sand my scales in fully assembled knife mode to get them exactly flush with the backspring. I dont use the 'good' parts that will be in the final build, just junker old ones. Its the only way I can get the perfectly flush.

                                      Keep up the great work!

                                      PM me or email sakmodder [at] gmail . com if you are looking for custom SAK work.

                                      Modding thread : Here
                                      Website : WWW.SAKModder.com
                                      Facebook : SAKModder
                                      Instagram : robertjlessard
                                      Youtube : www.youtube.com/robertjlessard

                                      1 Reply Last reply
                                      • Boaz Offline
                                        Boaz
                                        Posts: 316
                                        Boaz Offline
                                        Boaz
                                        wrote on last edited by
                                        #23 Quote Reply

                                          Thanks for sharing, I love to see this sort of project. I think this one looked very nice, I like the 'dead hole' details, it adds a little something. Nice work [emoji1]

                                          Merit Badges
                                          Flashlight Time Lord Level 3 Axe User
                                          1 Reply Last reply
                                          • m47mu74nt Offline
                                            m47mu74nt
                                            Posts: 2,520
                                            m47mu74nt Offline
                                            m47mu74nt
                                            wrote on last edited by
                                            #24 Quote Reply

                                              @Fortytwo said:
                                              Your friends should be happy!

                                              I hope so :)

                                              @Syph007 said:
                                              Good stuff! I like when people do progress pics, its nice to see how people work and step by steps are much more interesting then just posting the final build. In fact many successful blade makers started off and gained popularity specificly because they showed how they do their work. It draws in an audience.

                                              thank you, the issue with WIP is that it's difficult to both think about taking pictures and building, at least for newbies :D

                                              @Syph007 said:
                                              Some things I thought while reading.

                                              The liners are the best templates as you discovered. I use little clamps to hold them on the material then scribe lines around and remove. I used double sides tape before too.. annoying. :D

                                              hmmm so you don't pre-drill through the liners? as i don't have a good drill press, i need them in place to guide the drill bit :-\

                                              @Syph007 said:
                                              I didnt realize how much Ti-6-4 hardens when heated so if you are using any method to cut them that involves heat, drill holes first. This really caught me off guard when I made the fold over clip on the mini champ. It was impossible to tap the holes in that scale after it was heated to fold.

                                              This explains the behavior i faced when trying to cut Ti with the angle grinder!

                                              @Syph007 said:
                                              I grind/sand my scales in fully assembled knife mode to get them exactly flush with the backspring. I dont use the 'good' parts that will be in the final build, just junker old ones. Its the only way I can get the perfectly flush.

                                              Keep up the great work!

                                              nice tip! though i can't follow it until i have enough spare parts to make a dummy build dedicated to grinding, for now i already used the two non limited series of SAKs i had.. (the green Classic SD, and that Ecoline Nylon Sentry)

                                              @Boaz said:
                                              Thanks for sharing, I love to see this sort of project. I think this one looked very nice, I like the 'dead hole' details, it adds a little something. Nice work [emoji1]

                                              Here are some better pics: (i've notice with these that my rivets are far from "nice" so i reworked them a little [no pic yet])
                                              The dead holes aren't perfect either, looks like the old milling cutter (dremel one) i used didn't do it's job [or i failed using it :whistle:]
                                              This time the color scheme is much closer to reality!

                                              Meet me also on youtube & instagram for mostly knives (and multitools) content

                                              Merit Badges
                                              Scale Changer Hacker Mod User SAKWiki User Duct Tape BO Tools Level 3 Flashlight Paracord Carabiner User Discontinued SAK/MT Challenge Minimal SAK Challenge Titanium Camo SAK Stayglow SAK Zip Tie User Scaler User Birth Year SAK Hook User ALOX with Scissors MTO Tool MTo Store User Jack'O Lantern Badge ALOX Colors Level 3 Victorinox Spirit Challenge Toothpick User Tool Box Challenge  30 Day Vintage SAK Challenge 30 Day Rhymes with Orange Challenge MTo Anniversary Challenge LM Signal Challenge Wenger Collector Level 3 30 Day Ratchet Challenge MacGyver 30 Day Challenge 20th Anniversary Anything Goes Challenge
                                              1 Reply Last reply
                                              • Syph007 Offline
                                                Syph007
                                                Global Moderators
                                                Posts: 9,842
                                                Syph007 Offline
                                                Syph007
                                                Global Moderators
                                                wrote on last edited by
                                                #25 Quote Reply

                                                  @m47mu74nt said:

                                                  @Syph007 said:

                                                  Some things I thought while reading.

                                                  The liners are the best templates as you discovered. I use little clamps to hold them on the material then scribe lines around and remove. I used double sides tape before too.. annoying. :D

                                                  hmmm so you don't pre-drill through the liners? as i don't have a good drill press, i need them in place to guide the drill bit :-\

                                                  Oh yes I do use the liners as drilling templates too. But I actually take 4-5 liners rivetted together for that purpose so its a nice thick stack. I use this to drill that hidden 4th hole in all the 91mm Ti scales I do.

                                                  PM me or email sakmodder [at] gmail . com if you are looking for custom SAK work.

                                                  Modding thread : Here
                                                  Website : WWW.SAKModder.com
                                                  Facebook : SAKModder
                                                  Instagram : robertjlessard
                                                  Youtube : www.youtube.com/robertjlessard

                                                  1 Reply Last reply
                                                  • m47mu74nt Offline
                                                    m47mu74nt
                                                    Posts: 2,520
                                                    m47mu74nt Offline
                                                    m47mu74nt
                                                    wrote on last edited by
                                                    #26 Quote Reply

                                                      @Syph007 said:
                                                      Oh yes I do use the liners as drilling templates too. But I actually take 4-5 liners rivetted together for that purpose so its a nice thick stack. I use this to drill that hidden 4th hole in all the 91mm Ti scales I do.

                                                      Is there any thing i should really know before messing with a 91mm? i'd like to make one for a friend's birthday, but before failing i need some advices: is that much more complicated than a Classic?
                                                      i've already found that peening the 84mm rivets (used 2.0mm brass rod) is slightly more complicated than the 1.5mm i used for the Classic. Plus i'm a little worried about the back tools...

                                                      On another subject i'm preparing a post about my process of bi-color anodizing, if anybody wants to make colored recessed swiss cross in their Ti builds that could help :) (it is not a revolution, but it's quite different from what i've read before starting)

                                                      Meet me also on youtube & instagram for mostly knives (and multitools) content

                                                      Merit Badges
                                                      Scale Changer Hacker Mod User SAKWiki User Duct Tape BO Tools Level 3 Flashlight Paracord Carabiner User Discontinued SAK/MT Challenge Minimal SAK Challenge Titanium Camo SAK Stayglow SAK Zip Tie User Scaler User Birth Year SAK Hook User ALOX with Scissors MTO Tool MTo Store User Jack'O Lantern Badge ALOX Colors Level 3 Victorinox Spirit Challenge Toothpick User Tool Box Challenge  30 Day Vintage SAK Challenge 30 Day Rhymes with Orange Challenge MTo Anniversary Challenge LM Signal Challenge Wenger Collector Level 3 30 Day Ratchet Challenge MacGyver 30 Day Challenge 20th Anniversary Anything Goes Challenge
                                                      1 Reply Last reply
                                                      • temo Offline
                                                        temo
                                                        Posts: 639
                                                        temo Offline
                                                        temo
                                                        wrote on last edited by
                                                        #27 Quote Reply

                                                          I used 2x2.5mm and 2x2mm brass nails. I think 2.5mm on ends were easier. Also I did some errors with tools so had to rebuild my handyman plus. So good to check everything before peening. I would like to know if there would be simple tools and parts to do riverts like vic have (no need for hammering). Looks like pressed.

                                                          Merit Badges
                                                          The SUPER Challenge Stargazer Titanium Victorinox Spirit Challenge Mod User Time Lord Level 3 Hacker MTo Anniversary Challenge
                                                          1 Reply Last reply
                                                          • Teno Offline
                                                            Teno
                                                            Posts: 21
                                                            Teno Offline
                                                            Teno
                                                            wrote on last edited by
                                                            #28 Quote Reply

                                                              Very nice work!!!!

                                                              Marcelo, from Argentina

                                                              1 Reply Last reply
                                                              • m47mu74nt Offline
                                                                m47mu74nt
                                                                Posts: 2,520
                                                                m47mu74nt Offline
                                                                m47mu74nt
                                                                wrote on last edited by
                                                                #29 Quote Reply

                                                                  @temo said:
                                                                  I used 2x2.5mm and 2x2mm brass nails. I think 2.5mm on ends were easier. Also I did some errors with tools so had to rebuild my handyman plus. So good to check everything before peening. I would like to know if there would be simple tools and parts to do riverts like vic have (no need for hammering). Looks like pressed.

                                                                  This video gives us a clue :


                                                                  The rivets are friction and press fitted, the tool they use spins and press the rivet end (2min 15sec)

                                                                  Meet me also on youtube & instagram for mostly knives (and multitools) content

                                                                  Merit Badges
                                                                  Scale Changer Hacker Mod User SAKWiki User Duct Tape BO Tools Level 3 Flashlight Paracord Carabiner User Discontinued SAK/MT Challenge Minimal SAK Challenge Titanium Camo SAK Stayglow SAK Zip Tie User Scaler User Birth Year SAK Hook User ALOX with Scissors MTO Tool MTo Store User Jack'O Lantern Badge ALOX Colors Level 3 Victorinox Spirit Challenge Toothpick User Tool Box Challenge  30 Day Vintage SAK Challenge 30 Day Rhymes with Orange Challenge MTo Anniversary Challenge LM Signal Challenge Wenger Collector Level 3 30 Day Ratchet Challenge MacGyver 30 Day Challenge 20th Anniversary Anything Goes Challenge
                                                                  1 Reply Last reply
                                                                  • Sparky415 Offline
                                                                    Sparky415
                                                                    Posts: 13,000
                                                                    Sparky415 Offline
                                                                    Sparky415
                                                                    wrote on last edited by
                                                                    #30 Quote Reply

                                                                      Very nice looking work M :tu:

                                                                      :cheers:

                                                                      Everything’s adjustable

                                                                      1 Reply Last reply
                                                                      • Syph007 Offline
                                                                        Syph007
                                                                        Global Moderators
                                                                        Posts: 9,842
                                                                        Syph007 Offline
                                                                        Syph007
                                                                        Global Moderators
                                                                        wrote on last edited by Syph007
                                                                        #31 Quote Reply

                                                                          Victorinox uses an orbital rivet machine in that video.

                                                                          Link Preview Image
                                                                          Riveting machine - Wikipedia

                                                                          favicon

                                                                          (en.wikipedia.org)

                                                                          PM me or email sakmodder [at] gmail . com if you are looking for custom SAK work.

                                                                          Modding thread : Here
                                                                          Website : WWW.SAKModder.com
                                                                          Facebook : SAKModder
                                                                          Instagram : robertjlessard
                                                                          Youtube : www.youtube.com/robertjlessard

                                                                          1 Reply Last reply
                                                                          • temo Offline
                                                                            temo
                                                                            Posts: 639
                                                                            temo Offline
                                                                            temo
                                                                            wrote on last edited by
                                                                            #32 Quote Reply

                                                                              Tx. Yes called pushies or something. Should work with more simple tool then press as well (hammer and hit tool). Though should find some first.

                                                                              Merit Badges
                                                                              The SUPER Challenge Stargazer Titanium Victorinox Spirit Challenge Mod User Time Lord Level 3 Hacker MTo Anniversary Challenge
                                                                              1 Reply Last reply
                                                                              • Sparky415 Offline
                                                                                Sparky415
                                                                                Posts: 13,000
                                                                                Sparky415 Offline
                                                                                Sparky415
                                                                                wrote on last edited by
                                                                                #33 Quote Reply

                                                                                  I don’t know about you Guys but I save interesting pictures I find on the net
                                                                                  Not sure where I found it but this one might be useful to you M?

                                                                                  ti_color_large.jpg

                                                                                  Everything’s adjustable

                                                                                  1 Reply Last reply

                                                                                  Hello! It looks like you're interested in this conversation, but you don't have an account yet.

                                                                                  Getting fed up of having to scroll through the same posts each visit? When you register for an account, you'll always come back to exactly where you were before, and choose to be notified of new replies (either via email, or push notification). You'll also be able to save bookmarks and upvote posts to show your appreciation to other community members.

                                                                                  With your input, this post could be even better 💗

                                                                                  Register Login


                                                                                  • 1
                                                                                  • 2
                                                                                  • 3
                                                                                  • 4
                                                                                  • 5
                                                                                  • 6
                                                                                  1. Home
                                                                                  2. The Mod Squad
                                                                                  3. Newbie modding SAKs
                                                                                  Reply
                                                                                  • Reply as topic
                                                                                  Log in to reply
                                                                                  COMMUNITY LINKS
                                                                                  EDC-TV SAKWiki GearFeed SAKSelector
                                                                                  Operational Funds

                                                                                  Help us keep the Unworkable working!

                                                                                  Make A Donation
                                                                                  November Goal: $300.00
                                                                                  Due Date: Nov 30
                                                                                  Total Receipts: $0.00
                                                                                  Below Goal: $300.00
                                                                                  0% funded
                                                                                  • Login

                                                                                  • Don't have an account? Register

                                                                                  • Login or register to search.
                                                                                  • First post
                                                                                    Last post
                                                                                  0